• Menu
  • Skip to primary navigation
  • Skip to main content
  • Skip to primary sidebar

Before Header

  • About Us
  • Lexicon
  • Contact Us
  • Our Store
  • ↑
  • ↓

Balloon Juice

Come for the politics, stay for the snark.

Tide comes in. Tide goes out. You can’t explain that.

Baby steps, because the Republican Party is full of angry babies.

They were going to turn on one another at some point. It was inevitable.

Our job is not to persuade republicans but to defeat them.

Radicalized white males who support Trump are pitching a tent in the abyss.

Republicans seem to think life begins at the candlelight dinner the night before.

People identifying as christian while ignoring christ and his teachings is a strange thing indeed.

The only way through is to slog through the muck one step at at time.

Beware of advice from anyone for whom Democrats are “they” and not “we.”

Rupert, come get your orange boy, you petrified old dinosaur turd.

This year has been the longest three days of putin’s life.

Anne Laurie is a fucking hero in so many ways. ~ Betty Cracker

Make the republican party small enough to drown in a bathtub.

Dear Washington Post, you are the darkness now.

But frankly mr. cole, I’ll be happier when you get back to telling us to go fuck ourselves.

You are so fucked. Still, I wish you the best of luck.

People really shouldn’t expect the government to help after they watched the GOP drown it in a bathtub.

Republicans are radicals, not conservatives.

The low info voters probably won’t even notice or remember by their next lap around the goldfish bowl.

… gradually, and then suddenly.

Their freedom requires your slavery.

No one could have predicted…

Narcissists are always shocked to discover other people have agency.

They are lying in pursuit of an agenda.

Mobile Menu

  • Seattle Meet-up Post
  • 2025 Activism
  • Targeted Political Fundraising
  • Donate with Venmo, Zelle & PayPal
  • Site Feedback
  • War in Ukraine
  • Submit Photos to On the Road
  • Politics
  • On The Road
  • Open Threads
  • Topics
  • COVID-19
  • Authors
  • About Us
  • Contact Us
  • Lexicon
  • Our Store
  • Politics
  • Open Threads
  • 2025 Activism
  • Garden Chats
  • On The Road
  • Targeted Fundraising!
You are here: Home / Archives for Food & Recipes / Cooking

Cooking

Friday Recipe Exchange: Hearty Tomato Soup and Recipe Fails

by TaMara|  October 11, 20197:47 pm| 143 Comments

This post is in: Cooking, Recipes

JeffreyW’s tasty tomato soup and grilled cheese

Since we witnessed a 70-degree temperature drop here yesterday, soup had to be on the menu.  And since I have a counter full of ripe tomatoes, tomato soup sounded good.  This is not your basic canned soup and grilled cheese.  These recipes are tasty, hearty and easy to whip up.  And the flax cookies are addictive. If you’re using an Instant-Style Pot, I have instructions for that at the bottom of the soup recipe.

On the board:

  1. Hearty Tomato Soup
  2. Totally Awesome Grilled Cheese Sandwiches, recipe here
  3. Flax Cookies, recipe here

Hearty Tomato Soup

  • 28 oz canned or fresh tomatoes*
  • 1 tsp crushed garlic
  • 8 oz carrots
  • 2 stalks celery
  • 3 green onions, including greens
  • 1 tsp basil
  • ¼ tsp oregano
  • salt & pepper to taste
  • 2 cups milk
  • 2 tbsp whole wheat flour

2-quart saucepan, blender

In a blender, mix tomatoes, garlic, carrots, celery & onions. Blend until smooth. In saucepan, combine tomato mixture with spices, heat over medium heat, stirring constantly. Let bubble (don’t let boil or use high heat, it will scorch) for 5 minutes. Add flour to cold milk, blend until smooth, add to soup. Let bubble again, reduce to low heat and let simmer for 15 minutes. Stir occasionally.

Instant Pot instructions:  In a blender, mix tomatoes, garlic, carrots, celery & onions. Blend until smooth. In the instant pot, combine tomato mixture with spices. Cover and cook on soup setting for 10 minutes.  In a measuring cup (or use blender) add flour to cold milk, blend until smooth,

Use the quick depressurize method, soup should still be bubbling.  add milk mixture to soup and whisk in until thickened.  If you need to bring it back up to temperature, I use the saute feature, stirring constantly until thickened (about a minute), don’t let scorch. Turn heat off (or to warm setting) and cover until ready to serve.

*you can use fire-roasted tomatoes for added flavor. I have fire-roasted tomatoes tucked away in the freezer for future batches.

These Flax Cookies are addictive

(This menu and recipes are featured in my cookbook: What’s 4 Dinner Solutions Cookbooks: Summer into Fall)

_________________________________________________________________

What’s on your plate this weekend?

I had a request to ask if you wanted to share your biggest recipe disasters. Did you serve it anyway or just toss it?

I’ve had a couple of notable failures, including pulling out the powdered sugar instead of potato starch to thicken a spicy veggie soup. Sigh. No way to save that one.

Hit the comments with your recipes, meals, and disasters…

Here’s one of my favorite recipe fails, the end is priceless:


Friday Recipe Exchange: Hearty Tomato Soup and Recipe FailsPost + Comments (143)

Roasting, Cleaning and Freezing Chiles: Pueblo Hots

by Alain Chamot (1971-2020)|  September 5, 201910:00 am| 44 Comments

This post is in: Cooking, Open Threads


In late summer, a wonderful smell begins in Southern Colorado and New Mexico. Soon enough, parking lots everywhere are filled with folks selling fresh chiles and roasting them in rotating “barrels” over propane jets. The smell of the copious smoke clouds that puff up is incredible: a smoky, vegetal, clinging stench with lots of bitter and char. The popping and crackling of the skins and seeds, the hiss of the steam from blasts of water, and the roar of the propane are the sounds of the season.

A few weeks ago, I drove to Colorado and returned with a small bag of fresh Pueblo Hots. There are different types of chiles and they are grown in different areas. Like all agricultural products, the soil, sun, wind, and water have a strong effect on flavor and texture. The most famous chiles – from New Mexico – are primarily Hatch, which is where they are grown. I’ve also has Socorro chiles, and they were also divine.  In Southern Colorado, Pueblo is well-known for farms and for great chiles, the Pueblo chile. It’s a different chile than the New Mexico chiles, and has a slightly different flavor, a bit more bitter. They aren’t as long as the New Mexico chiles, and they have the more classic “chile” shape used in advertising and such.

Needless to say, they’re all good, but I’m especially stoked to have some true-blue Pueblo Hots. (Hots as compared to Very Hots or Mediums – I need my ass to be a non-burning issue, so I didn’t go crazy!)

Chiles prefer hot, dry days and cool nights. In a normal year, there would be heaps of Pueblo chiles, but there were just a couple of baskets. When I was rung up at the farm store, they advised me to come early in September because the harvest was the worst ever and they would run out very early. The cause of all of this – too much rain! It’s raining multiple times a week and many fields aren’t getting enough chance to dry out and it’s causing mildew and other moisture-related issues they normally don’t worry about. This is yet another example of climate change seeming beneficial at first glance, but proving to be a change that threatens agriculture. In this case, extra rain in an arid environment that depends on irrigation for crops means that best practices, infrastructure, and localized plant stock are threatened.

Ok, enough background, let’s get cooking!

show full post on front page

Prepping

Before you begin, locate and stage your tools:

For roasting:

  • tongs
  • heat-resistant tray (I prefer stainless steel)
  • spray bottle with fresh cool water (tap water is fine)

For cleaning:

  • clean cutting board
  • plate or second cutting board
  • sharp knife, small-medium
  • gloves
  • bowl for the “trash”
  • parchment paper (NOT wax!) cut into squares (I use burger patty papers)
  • tray or plate to put individual cleaned peppers in the freezer to pre-freeze
  • gallon-size plastic bag(s) or vacuum sealing bags

First, I wash/rinse them in the sink and throw away any funky ones beyond rescue.

Get a grill nice and hot (500F or more). Depending on your sensitivity to capsaicin, you may want a mask so you don’t breath in pepper smoke. Clean the grill to ensure there is no leftover food debris or oil. The chiles will be grilled dry.


Roasting

Place the chiles on a clean grill. You do not need oil or anything like that. Close the grill.

After a few minutes, check the bottom of the chiles to see if there’s some good roasting marks. If so, flip and rotate them.

Steam

Throughout the roasting process, spritz them liberally (don’t go crazy but don’t be shy). Steam should instantly appear and make cool sounds and puffs.  This is good – the steam helps loosen the skins.

Cook until all peppers are well-roasted, rotating and flipping and applying more steam.

Smaller peppers will cook quicker, as will those over hot spots, so take care and move the cooked ones to your tray while the rest finish.

Once they are cooked, take the tray indoors to reduce insect issues and cover loosely with foil. Let them steam/rest for 10-20 minutes and then the final stages begin.

Cleaning

Put gloves on and grab a pepper and move it to your cleaning surface.

With the back of a thin knife (paring, for example), lightly scrape the burned skin and all other skin off.

Cut off the stem side and remove any defects.

Carefully cut from the stem side to the tip, only cutting through one layer of the chile.

Now open the pepper and, using the back of the knife, scrape the seeds and the major vein masses. These are major sources of heat, so leave some, to your liking.

Once the inside is in good shape, flip the chile and ensure that most-to-all of the skin is removed. Small black flecks are welcome, but larger pieces are not desirable.

Packing

Place the cleaned pepper on a parchment paper square.  In our household, we call them “squids” for obvious reasons.

Arrange a single layer of squids on a baking sheet or tray and put it in the freezer.


After 30-60 minutes, remove from the freezer. Stack the squids and put them in a large ziplock or vacuum sealer bag. I have limited freezer room, so I freeze them in batches and collect them in a bag until my final freezing step.


Because I roast and freeze chiles once a year, then keep them for that long, I always vacuum seal in batches of 12-20 so when I open a bag, I don’t have 3 months of chiles to eat before freezer burn sets in. Having individually-frozen chiles is a nice treat because you can more-easily separate one or a few without having to defrost a big hunk. Some folks I know freeze them in big blocks and just shave off what they need, but again, freezer burn.

I have had 5 year old frozen chiles and they were still fine, as long as they were vacuum sealed, so for longer-term storage don’t waste your precious produce on non-vacuum tech.

A final note: in the time since I first wrote this draft, the annual “Hatch Chile Days” at Wegmans happened, so I bought a few Hatch mediums and hots, already roasted, and cleaned and froze them. I have a nice two shelves of frozen chiles! I can’t wait to do a few small taste comparisons and yes, I’ll share some recipes and techniques. Chiles are a wonderful, healthy addition to your diet.

A final note – it sure is nice that I can get fresh Hatch chiles one weekend each summer near me; it has become an annual late-August event I begin to long for, come mid-July.

If anyone is curious, I buy my Pueblo chiles at Musso Farms, just East of Pueblo on US-50. They do ship!


Roasting, Cleaning and Freezing Chiles: Pueblo HotsPost + Comments (44)

Friday Recipe Exchange: Garden Fresh

by TaMara|  August 23, 20198:51 pm| 23 Comments

This post is in: Cooking, Food & Recipes, Recipes

Oh, boy, recipes two weeks in a row, we might be starting something here.

I spent the afternoon taking care of some fresh veggies that had been sitting on my counter all week. I love this time of year, when the garden provides harvest every morning. But it is difficult to keep up. Today I fire-roasted tomatoes, pureed and froze for soups and sauces this winter. I also did refrigerator jalapeno pickles to use up a few of the many jalapenos.

JeffreyW does some amazing recipes with his peppers, here are two: Candied Jalapenos (here) and Hot ‘n Sweet (here)

Tonight’s menu takes advantage of all the garden-fresh ingredients available now.  I really like this one because it’s a quick skillet taste treat that elevates a weeknight meal.

On the board tonight:

MENU
Skillet Lasagna (recipe below)
Patty Squash Sauté (recipe here)
Italian Bread
Cherries

Skillet Lasagna

  • 6 oz Mafalda (mini-lasagna noodles) or bowtie pasta
  • 1 lb lean ground beef****
  • ½ onion, chopped
  • ½ green pepper chopped
  • 1 tsp basil, crushed
  • 1 tsp oregano, crushed
  • 1 tsp crushed garlic
  • salt & pepper to taste
  • 1 carrot, diced
  • 15 oz can tomato sauce (or 1 lb fresh tomatoes, chopped or pureed)
  • 6 oz can tomato paste
  • 4 oz ricotta cheese
  • 1 cup fresh spinach leaves, chopped
  • 4 oz mozzarella cheese, shredded
  • 2 oz grated parmesan

skillet
saucepan

In saucepan, cook pasta according to package directions, cooking to al dente (slightly chewy), drain well.  Meanwhile, in skillet brown beef, onion & pepper. Add spices, garlic, carrot and sauté for 1 minute.  Add sauce, paste, stirring well into meat mixture.  Add pasta, stirring gently to mix.

Mix together ricotta and spinach, spoon evenly into the mixture (do not stir in, you want to create little cheese balls), top with mozzarella, cover and let simmer on low until mozzarella is completely melted.

Serve with parmesan.

Just a note, this menu and recipes are from my Summer into Fall Cookbook.

That’s if for this week. If I get a chance to upload the roasted tomato photos this weekend, I’ll post them here. What’s on your plate this weekend?

Hit to comments to share your recipes.

Otherwise, open thread.

****ETA: Thanks to Ohio Mom for reminding me I was going to say, you can easily omit the beef. I have substituted zucchini and or mushrooms and left the meat out entirely. It’s a great vegetarian dish.

Friday Recipe Exchange: Garden FreshPost + Comments (23)

Field Canning: Useful Technique For Camping, Emergencies, Etc.

by Alain Chamot (1971-2020)|  August 20, 201910:30 am| 45 Comments

This post is in: Cooking, Open Threads

Folks,

Today I want to teach you a bit about canning, and about a simple technique that can help preserve food or keep things water/vermin proof when you don’t have normal storage or preservation available.


The Basics of Canning

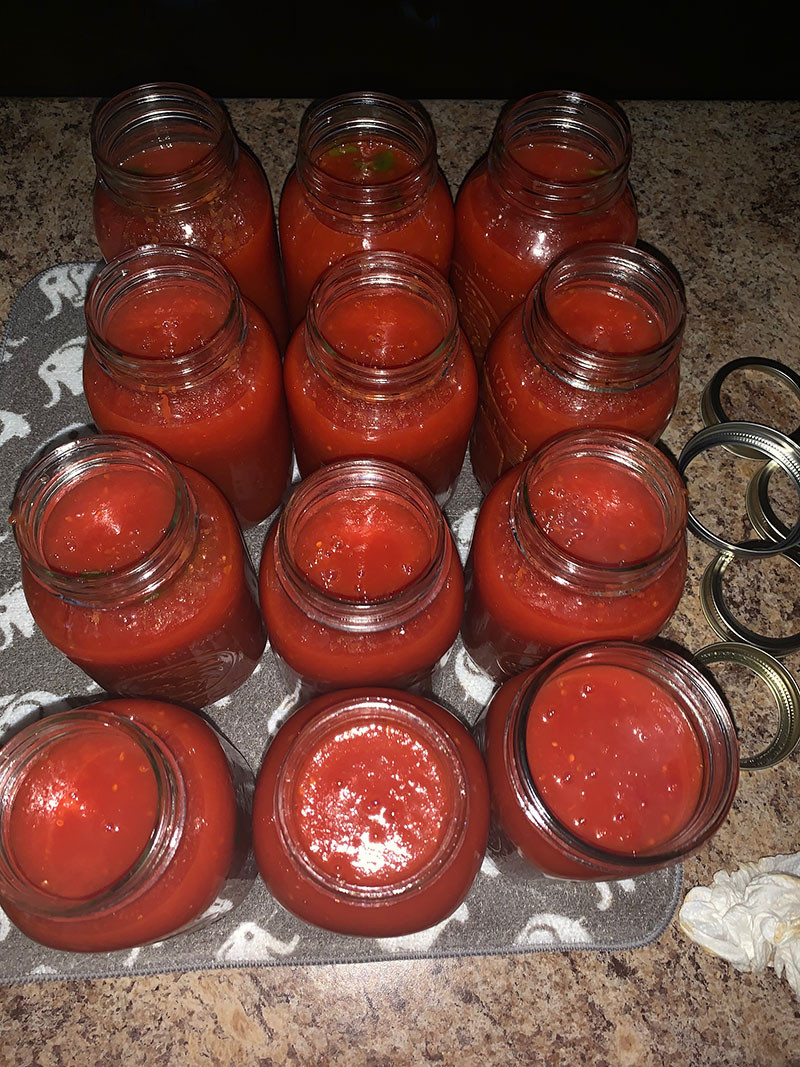
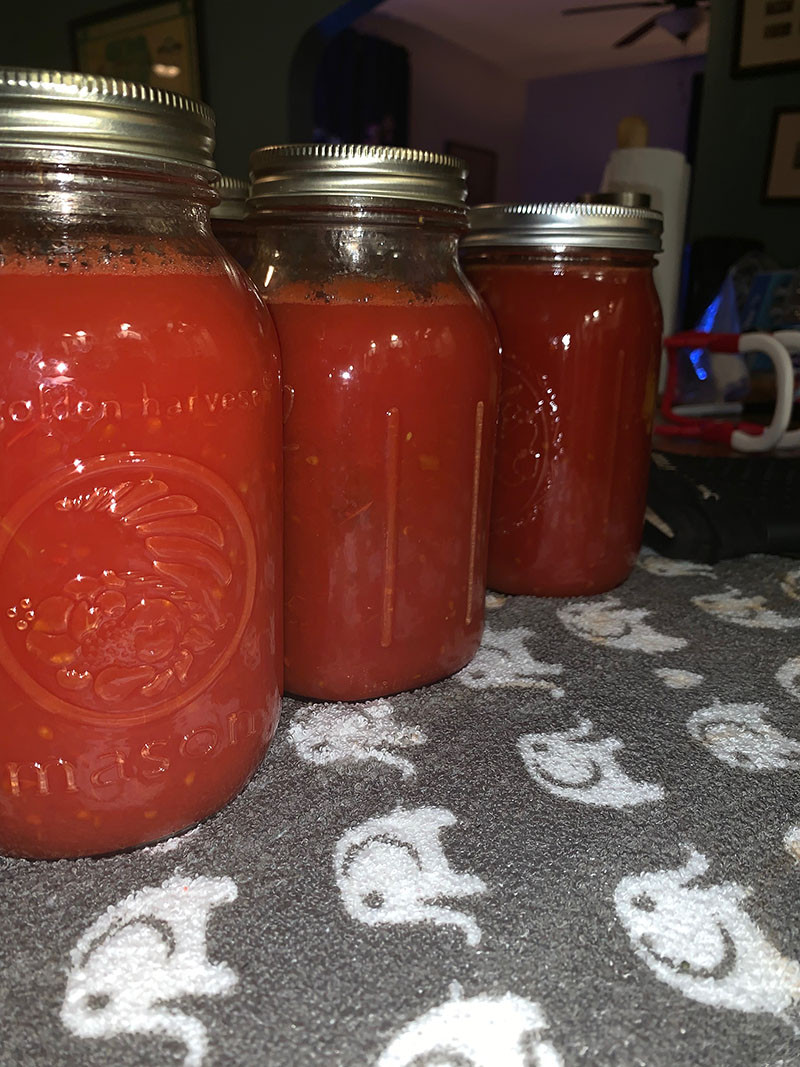
Canning is a simple concept – you put things in a jar, put a lid on it, and, using a variety of techniques, draw air out of the jar so that a slight vacuum is created inside, which keeps the lid snug and the things inside air-and-contaminant free. Well-processed canned goods can last decades without spoiling.

Normally, this involves a water bath canning setup, for most fruits and veggies, and occasionally calls for a pressure canner for meats and some fruit and veggie products. Note – this is because you can get to a higher effective temperature with a pressure canner and so you can ensure that your meat/tetchy-fruit/veggie contents are safe.

A water bath canner is just a large wide pot in which you boil water and put filled jars into, in order to heat them to boiling temperature and get the residual air in the jars to expand and force itself out through the not-firm seal. The heat affects a sealant on the lid that helps it adhere ever-so-slightly to the clean glass as the escaping gas causes a vacuum in the jar. A pressure canner is just a large pressure cooker; mine is like 13 inches high and 12 around. I left my dedicated water bath canner in Colorado when I went “wagons-East”, but my pressure canner suffices for both purposes, I just leave the lid off except when initially heating the water.

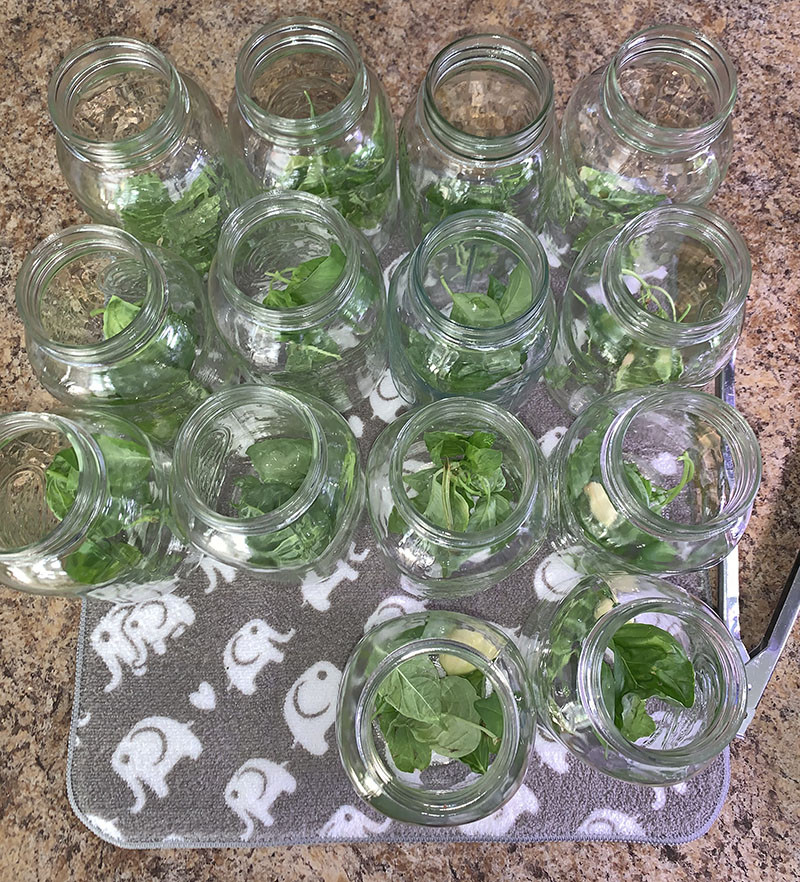
Lids and rings are the two other pieces of the canning puzzle. Both are sanitized before use (I boil them in a saucepan and keep it on a low simmer) and the lids have a design that means that once they seal, they permanently deform when opened so they cannot be used to re-seal a jar in a canning setup.


Field Canning

The idea for field canning came when I was camping and I wondered if there was a better way to deal with half-eaten contents than just putting a lid back on a jar. I did some research once home, and voila – field canning. It is not hygenic-per-se and does not result in safe food – it just seals a jar with a light vacuum seal.

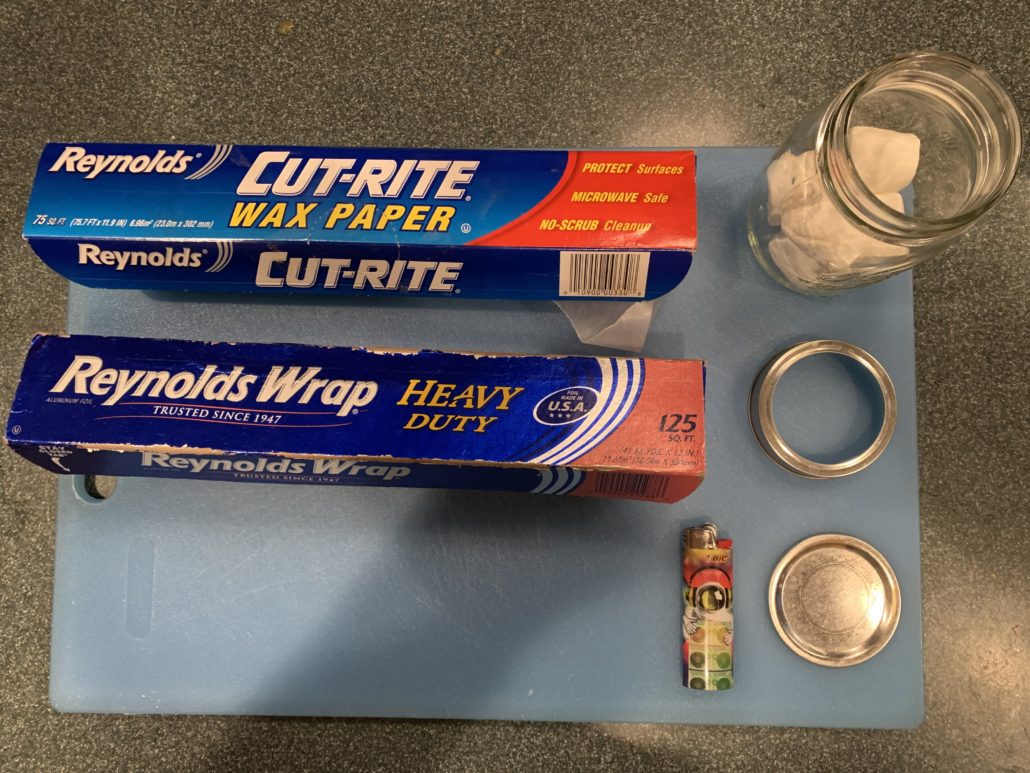
Field canning is useful whenever you have a need to seal a jar and don’t have proper canning equipment. It requires – a semi-full jar of something, some wax paper, some foil, a lighter/match, a non-used lid (i.e., a new or not used to vacuum seal lid extra from the jar), and, ideally, the ring for the jar lid.


From here, it’s quite simple:

  1. Make sure your lid is clean and unused; this technique will not work with an already-used lid.
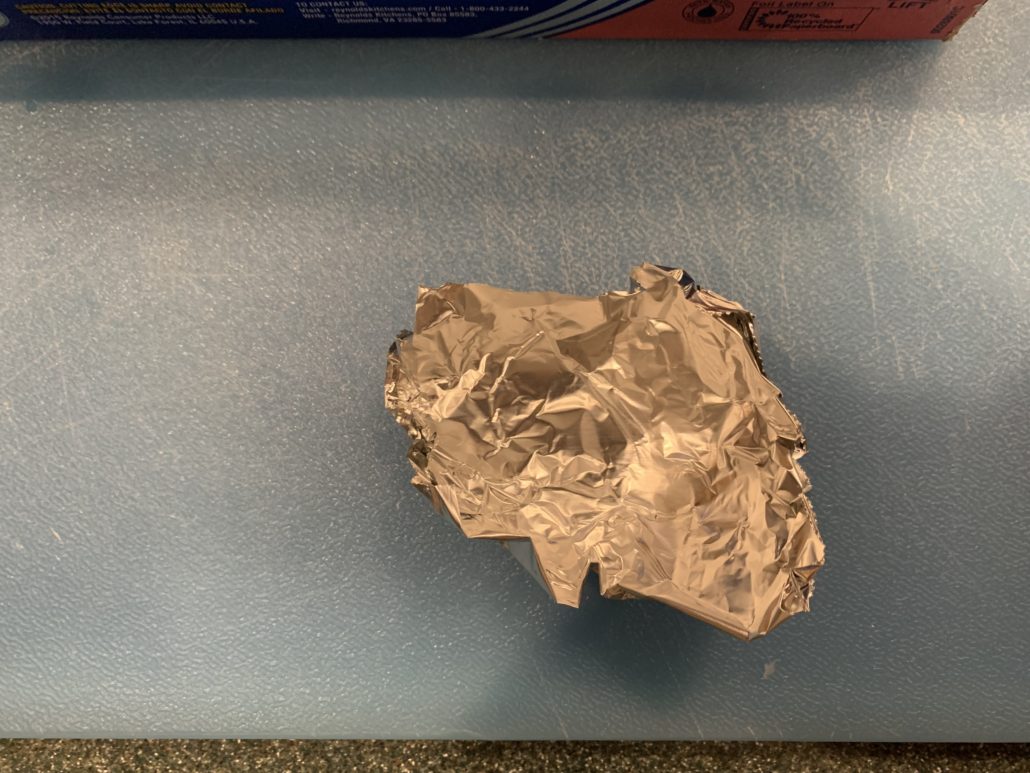
  2. Take a small piece of foil and make a small “boat”, nothing ornate. This will protect the jar contents from flame and ash.
  3. Take a small piece of wax paper and roll it into a wick. When I put it in the jar, I try and and bend it into a “U” shape to ensure it sits with the burning end sticking.
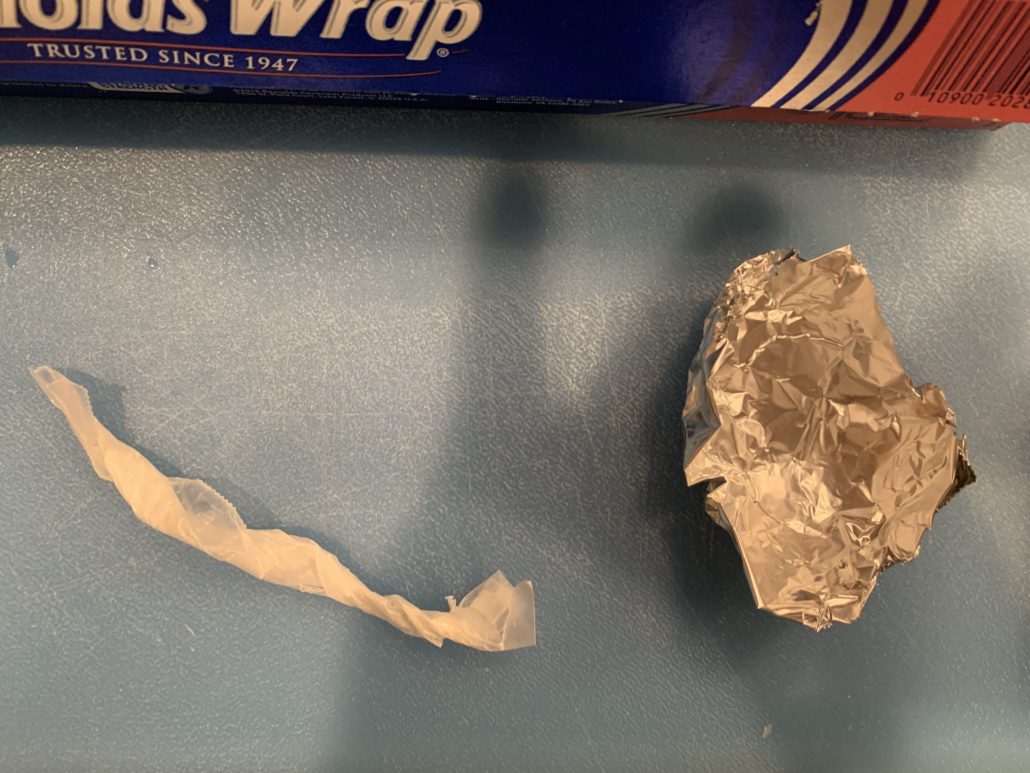
  4. Put the foil boat into the jar and adjust its edges so that wick/ash won’t fall.
  5. Wipe the jar edge with a clean, very slightly damp paper towel or cloth and make sure the lid and ring are ready.
  6. Light the wick and put it on the foil.
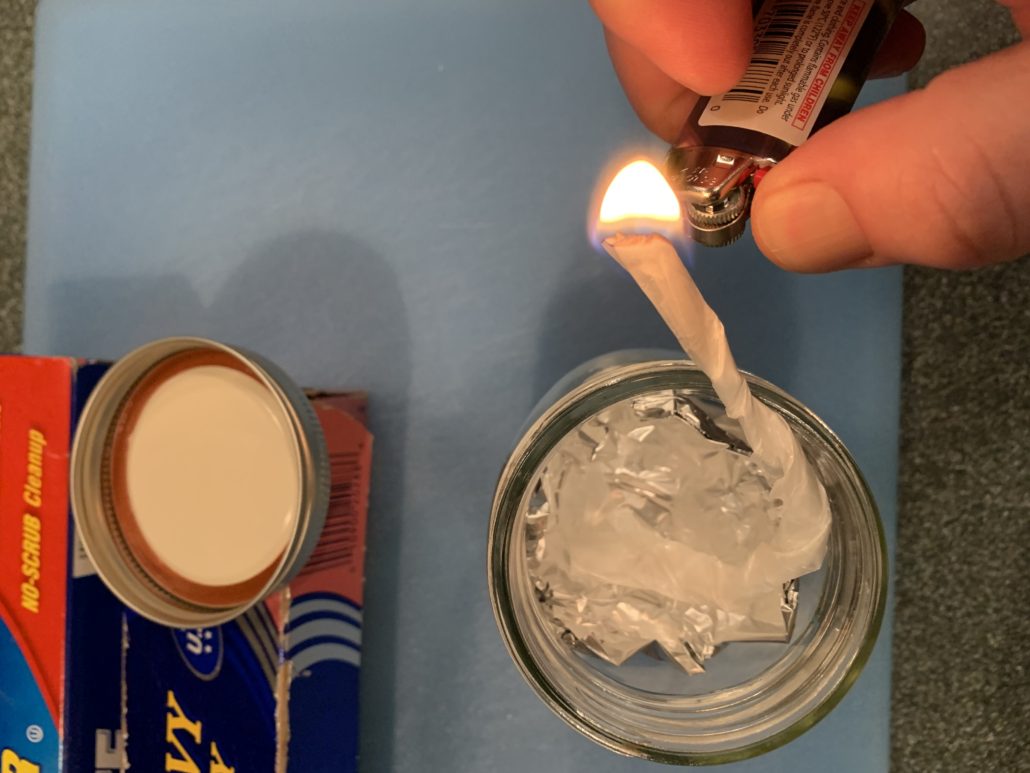
  7. As quickly as you can, carefully stuff the burning wick down a bit and put the lid on the jar and press it down gently but firmly. The flame will sputter and keep burning for what seems like forever; in reality it’s just a couple of seconds.
  8. Screw the ring on snugly to ensure the lid isn’t jostled; depending on your altitude and how much burning there was after you closed the jar, the vacuum seal on the lid may be delicate.


At this point, the jar is sealed with a light vacuum seal and there is little-to-no oxygen inside. The contents are safer from spoilage than they would be just with a closed jar, though they may have a slight smoke flavor from the wax paper.

This is NOT a true form of canning – because the contents are not brought to boiling, you’re not making the food inside safe. This technique is only one for sealing for temporary preservation, where you want no air in the jar, or want the stuff inside staying waterproof (in case of a flood, for example). It can be great when camping because you can open and reseal a large jar repeatedly, only limited by the number of unused lids you have.


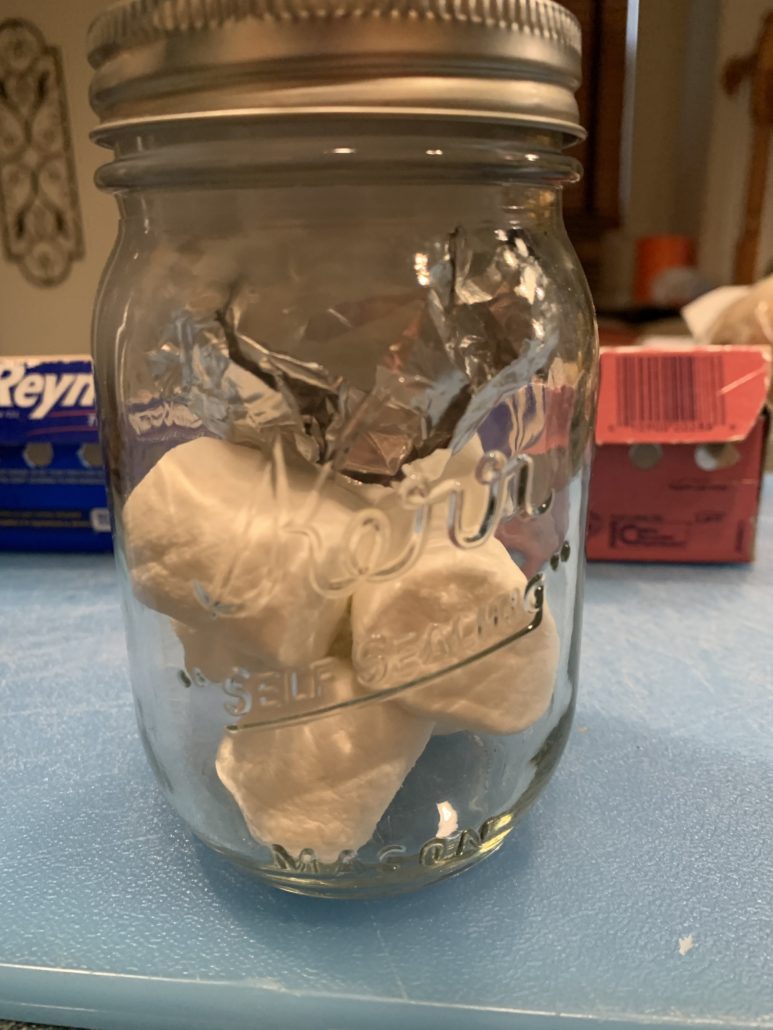
An afterthought is that you’d more likely keep the graham crackers in the jar so they don’t get moist than the marshmallows, but they were at hand.


Thus endeth the lesson.

Field Canning: Useful Technique For Camping, Emergencies, Etc.Post + Comments (45)

Friday Recipe Exchange: Summer Grilling

by TaMara|  August 16, 20197:27 pm| 72 Comments

This post is in: Cooking, Food & Recipes, Recipes

strawberries over pound cake

Nobody says the sliced strawberries can’t be served over pound cake. Photo by JeffreyW

I finally finished the first of four cookbooks, so I thought I’d start the recipe threads again. Since I have the menus already formatted, it’s easy enough to copy and paste them into a thread once a week.  I’ve had a few requests to start posting again, if only so everyone has a place to share recipes. Seems like a good idea these days.

On the board tonight: Santa Fe Chicken and Black Bean Salad

MENU
Santa Fe Chicken Breasts (recipe below)
Tortilla chips
Black Bean Salad  (recipe here)
Sliced Strawberries

Santa Fe Chicken Breast

  • 4 boneless chicken breasts
  • ¼ cup red wine vinegar
  • ¼ cup chopped cilantro
  • 1 tsp crushed garlic
  • 1 cup Picante or salsa (Fresh Salsa recipe here)
  • 4 oz sliced Monterey jack cheese

Reusable plastic container

Add chicken, vinegar and cilantro to reusable container and marinate 1 hour or overnight.

Remove chicken from marinade and slice each breast in a butterfly cut (slicing in half horizontally, but leaving attached at one edge, so it folds open like butterfly wings).

Fold open and grill or broil until cooked through (as little as 5 minutes each side, depending on heat and thickness).

Don’t let dry out.  Use a meat thermometer – remove at 165°

On one half of each breast, add 1 oz cheese and 2 tbsp or more of Picante/salsa, fold other half over and heat until cheese is melted.

Serve immediately.

cookbook

That’s it for this week. What’s cooking in your kitchen? Go ahead and share your favorite recipes and tips.  Otherwise, open thread.

Friday Recipe Exchange: Summer GrillingPost + Comments (72)

In the Kitchen With John- Tomato Sauce

by John Cole|  August 10, 20199:54 pm| 60 Comments

This post is in: Cooking, John Cole Presents "This Fucking Old House"

As I mentioned last night, today was sauce day. As always, this is more for me than you all, as I will look this up next year to refresh my memory before doing it again- you all are just along for the ride. Started last night with a ton of tomatoes I had frozen over the last couple OF months (love you eemom):

They mostly thawed over night and I threw them into big pots to start the cookdown:

Now everybody will tell you different amounts of time to cook them down, I just did it for about 2 hours, constantly stirring because you simply can not let it scorch or you have ruined the entire batch. STIR, STIR, STIR. Once the pulp and everything has cooked down into a bubbly brew, run it through your food mill:

If you are like me, you probably don’t have a dozen 24 qt stock pots, I have just the one and the pot for canning, so I strained them into several smaller pots, washed the big 24 qt stock pot I originally used, then transferred everything back into that. Then I did the canning pot full of tomatoes, and after cooking down and removing all the seeds and peels, everything transferred to the 24 qt stock pot and filled it all the way to the top.

At this point, Tammy and I just took 30 minute shifts stirring as we cooked it down. I cooked it down a solid6-8 inches to let it thicken, because I didn’t want to can tomato juice. This took the bulk of the afternoon, and both of us got our workout in.

QUICK SIDEBAR- Are there any carpenters who want to make me a 24″ wooden spoon. I hate the flimsy ass wooden spoons on amazon, I need something longer than the traditional ones, and I need something small than a 4 foot cajun paddle.

While cooking down the sauce, we prepped the mason jars:

I cut some basil from the garden, washed it, and placed it in each jar. Also, in three of them, Tammy wanted to try a clove of garlic, so three of them got that and the basil.

When the sauce is finally cooked down to where you want it, grab your funnel and ladle it into each jar stopping below the neck:

Wipe off the tops of the jars with a damp cloth, and place a lid and a ring on each one (you should have the lids heated in a hot water bath so you get a good seal), and hand tighten the ring. Then place them in the canner and wait for it to get to a rolling boil, and then process it for 40 minutes. Here is your finished product:

In total, we got 17 quarts of sauce. I thought about running the sauce through the chinois after it went through the food mill, but decided I didn’t care if there were a few seeds- YMMV. I’m not trying to win the damned state fair. And remember, NONE of this is seasoned (other than the basil). That way you can just pull it out and use it and tailor the sauce to your tastes.

As always, the dogs were a giant help:

And because Tammy is a Rosie Whisperer, here is a closeup of Rosie ACTUALLY LOOKING AT THE DAMNED CAMERA:

In the Kitchen With John- Tomato SaucePost + Comments (60)

On The Glory That Is Japanese Mayonnaise

by Alain Chamot (1971-2020)|  April 11, 201910:50 am| 105 Comments

This post is in: Cooking, Not Politics, Open Threads

Folks,

Sorry I’ve not been around a lot recently. I’ve been sucked into some other things and that’s not changed much, but I did want to post and say hi and share something other than politics to think about. I hope to post more often, on a variety of non-political topics.


So, like a good son of a Swiss father with many Swiss and Belgian cousins, I love me some mayonnaise. I mean, I love love love it – I was that college sophomore who lived off campus and occasionally made my own in my blender because the store shelves back then disappointed. I eat it on fries, burger buns, sandwiches, fried fish, subs, and many, many things. Not a fan of mayo-based “salads”, to be honest, but besides that, mayonnaise is regal. Well, except tuna salad. Truly a wonder food.

In all my years of cooking with Asian ingredients, and having first been to Japan 21 years ago, I’ve often seen and encountered Japanese mayonnaise, often the Kewpie brand. I’ve had Japanese mayonnaise in Japan and the US and liked it, but once I found it was the magic ingredient in some yummy noodles I love, I knew I had to try it at home.

That was a couple of years ago – until then I’d never bought it. OMG what a mistake! I cannot believe I’ve missed this divine stuff for so long, wasted years not enjoying it often. If you like mayo, try it. It is, of course, a great mayo for most mayo uses, but I prefer it as a sauce for any number of things. It’s so, so good. It’s a yolkier, creamier, and sweeter mayonnaise than what we’re used to, plus it has a tiny bit of MSG/seaweed extract in it to pump up the umami.

So it’s like a better mayo plus a bit of extra umami kick. I’ve eaten it, plain, as a dipping sauce for often-cold leftovers of many forms of beef, pork, chicken, shrimp, and veggies. It’s also great to make any of your favorite dipping sauces beyond the basic, so adding horseradish, garlic, capers, shallot, onion, any type of hot sauce, vinegar, herbs, spices, mustard, ketchup, bbq sauce, maple syrup (try, don’t judge), lemon or lime juice; I’ve made quite an assortment of dipping sauces for all kinds of meals. I’ve not yet tried this, but allegedly, some chefs use it instead of butter for pan frying some dishes.

Give it a try – it doesn’t have to be Kewpie, but that’s a great brand. It’s shelf-stable until opened. I expect you can buy it at some better “normal” markets, but I’d recommend finding a good Asian market so you can have a little adventure as well. There are so many treasures you can find there, so even if you’re not a mayonnaise fan, go shop there and buy interesting things.  You can ask questions, or pull out the phone and research. It’s amazing what you can discover and experiment with, cheaply.

I’ve often found an enjoyable hour or two wandering around the produce aisle, looking up descriptions, translations, and recipes for what I find. Even if I don’t buy something on that trip, some of those new things percolate in the back of my brain and two months later, “out of the blue”, I’ll be inspired to look up a recipe or two and try them out.

Consider this an open thread for non-political stuff, ideally cooking- or food-related.

On The Glory That Is Japanese MayonnaisePost + Comments (105)

  • « Go to Previous Page
  • Go to page 1
  • Go to page 2
  • Go to page 3
  • Go to page 4
  • Go to page 5
  • Go to page 6
  • Interim pages omitted …
  • Go to page 55
  • Go to Next Page »

Primary Sidebar

On The Road - BarcaChicago  - Off the Gunflint Trail/Boundary Waters 6
Image by BarcaChicago (7/7/25)

World Central Kitchen

Donate

Recent Comments

  • Cheryl from Maryland on Tubas & Trombones for Peace (Open Thread) (Jul 8, 2025 @ 12:49pm)
  • Betty Cracker on Sharing Is Caring Open Thread: Calls to Action (Jul 8, 2025 @ 12:48pm)
  • JML on Sharing Is Caring Open Thread: Calls to Action (Jul 8, 2025 @ 12:46pm)
  • Kirk on Sharing Is Caring Open Thread: Calls to Action (Jul 8, 2025 @ 12:45pm)
  • Matt McIrvin on Sharing Is Caring Open Thread: Calls to Action (Jul 8, 2025 @ 12:45pm)

Balloon Juice Posts

View by Topic
View by Author
View by Month & Year
View by Past Author

Featuring

Medium Cool
Artists in Our Midst
Authors in Our Midst
No Kings Protests June 14 2025

🎈Keep Balloon Juice Ad Free

Become a Balloon Juice Patreon
Donate with Venmo, Zelle or PayPal

Calling All Jackals

Site Feedback
Nominate a Rotating Tag
Submit Photos to On the Road
Balloon Juice Anniversary (All Links)
Balloon Juice Anniversary (All Posts)
Fix Nyms with Apostrophes

Social Media

Balloon Juice
WaterGirl
TaMara
John Cole
DougJ (aka NYT Pitchbot)
Betty Cracker
Tom Levenson
David Anderson
Major Major Major Major
DougJ NYT Pitchbot
mistermix

Keeping Track

Legal Challenges (Lawfare)
Republicans Fleeing Town Halls (TPM)
21 Letters (to Borrow or Steal)
Search Donations from a Brand

Feeling Defeated?  If We Give Up, It's Game Over

Site Footer

Come for the politics, stay for the snark.

  • Facebook
  • RSS
  • Twitter
  • YouTube
  • Comment Policy
  • Our Authors
  • Blogroll
  • Our Artists
  • Privacy Policy

Copyright © 2025 Dev Balloon Juice · All Rights Reserved · Powered by BizBudding Inc